Key Takeaways
-
The RØDE VideoMic Pro+ is an on-camera shotgun microphone ideal for capturing high-quality audio in wildlife documentaries.
-
Key features include a super-cardioid polar pattern, ultra low-noise electronics, and user-friendly controls.
-
Good audio can make a documentary more immersive and engaging, distinguishing your work from others.
-
Setting up the VideoMic Pro+ involves attaching it to your camera and adjusting the settings to suit your environment.
-
Maintenance and proper handling are essential for preserving the quality and longevity of your microphone.
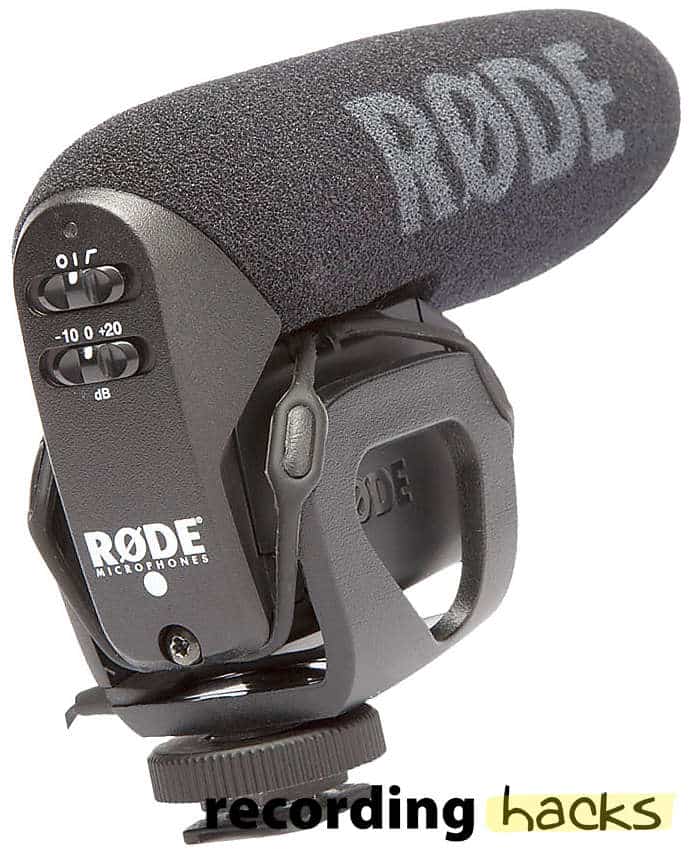
“RØDE VideoMic Pro | RecordingHacks.com” from recordinghacks.com and used with no modifications.
Capturing the Call of the Wild: Rode VideoMic Pro+ in Action
When you’re out in the field, documenting the intricate details of the natural world, every sound matters. The rustle of leaves, the distant call of a bird, the subtle movement of a predator – these are the sounds that can transport your audience from their seats into the heart of the wilderness. To capture these moments with the clarity they deserve, you need a microphone that’s up to the task. Enter the RØDE VideoMic Pro+.
Revolutionizing Wildlife Audio Capture
With the VideoMic Pro+, you’re not just recording sound; you’re capturing an audio experience that complements your visual storytelling. This microphone has been engineered to pick up the nuances of nature with precision. Whether you’re dealing with the whisper of the wind or the roar of a waterfall, the VideoMic Pro+ ensures your audience hears every layer as if they’re standing right beside you.
“The VideoMic Pro+ is more than just a microphone; it’s an essential tool for filmmakers who want to bring the symphony of the natural world to life.”
Key Features Tailored for Animal Documentaries
What makes the VideoMic Pro+ particularly suited for animal documentaries? Let’s break it down:
-
Super-cardioid polar pattern: Focuses on sound in front of the camera while minimizing background noise.
-
Ultra low-noise electronics: Ensures your recordings are crystal clear, without the interference of hiss or hum.
-
High-frequency boost: Enhances the details in your recordings, perfect for capturing the subtle sounds of wildlife.
-
Two-stage high pass filter: Eliminates low-frequency background noise such as traffic or air conditioners, which is crucial in outdoor settings.
With these features, the VideoMic Pro+ is not just a piece of equipment; it’s a gateway to a more profound connection with nature.
Why Audio Matters in Wildlife Filmmaking
Imagine watching a documentary about the Serengeti. You see the majestic lions and the graceful gazelles, but all you hear is a muffled, distant sound. It’s jarring, isn’t it? That’s because audio is half the experience in filmmaking, especially when it comes to wildlife.
Creating an Immersive Experience
When the audio is as vivid as the visual, it creates a sense of presence. This is what makes the difference between watching a documentary and experiencing it. With the VideoMic Pro+, you’re equipping yourself to deliver that immersive experience by capturing the full spectrum of sounds that nature offers.
Distinguishing Your Work with Superior Sound
Quality audio is also a mark of professionalism that can set your work apart. It shows that you care about every aspect of your documentary, from the sweeping landscapes to the tiniest insect’s footsteps. This attention to detail is what can elevate your project from good to unforgettable.
Unboxing the VideoMic Pro+: What to Expect
When you first get your hands on the VideoMic Pro+, you’ll notice its sturdy construction. This is a microphone designed to withstand the rigors of outdoor filmmaking. But it’s not just about durability; the design is intuitive, making it easy to use even for those who are new to audio equipment.
First Impressions and Build Quality
The microphone feels substantial yet lightweight, a balance that’s essential when you’re on the move. The anti-shock mount reduces handling noise, and the foam windscreen helps minimize wind interference – a common challenge in outdoor recording.
Comprehensive Accessory Kit
In the box, you’ll also find a range of accessories, ensuring you’re ready to capture high-quality audio in any setting. For more details on microphone selection and accessories, visit our guide on perfecting the call of the wild audio experience.
-
A furry windjammer for additional wind protection
-
A rechargeable lithium battery, ensuring you won’t run out of power in the field
-
And cables to connect the microphone to your camera or recording device
These inclusions mean you’re ready to start recording right out of the box, no matter where your documentary journey takes you.
Setting Up Your VideoMic Pro+ for Field Use
Once you’ve familiarized yourself with the VideoMic Pro+ and its accessories, it’s time to set it up for field recording. This is where you prepare to capture the vibrant tapestry of sounds that the wilderness offers.
Attaching to Camera and Adjusting Settings
Mounting the VideoMic Pro+ on your camera is a breeze. Slide it onto the camera’s hot shoe, tighten the screw, and connect the 3.5mm cable from the microphone to your camera’s audio input. Power on, and you’re almost ready to go. But first, you’ll want to dive into the settings:
-
Set your audio levels to manual on your camera, if possible, to avoid automatic gain control interference.
-
Adjust the gain control on the VideoMic Pro+ to match your environment. A lower setting is ideal for loud environments, while a higher setting works for quieter scenes.
-
Test and listen with headphones to ensure the sound is clear and free of distortion.
These steps are crucial because they ensure that you’re not just capturing sound, but capturing it well.
Optimizing Audio Capture in Varied Environments
Different environments call for different audio strategies. If you’re filming in a forest, the density of the foliage may dampen sound, requiring a higher gain setting. Conversely, an open savannah might carry sound further, allowing for a lower gain setting. Always take a moment to listen to your surroundings and adjust accordingly.
And remember, the golden rule of audio recording: always monitor with headphones. This is how you catch issues before they become problems in post-production.
Advanced Features of the VideoMic Pro+ and How to Use Them
The VideoMic Pro+ isn’t just a microphone; it’s a toolkit for sound artistry. Understanding and utilizing its advanced features will give you an edge in the field.
The Safety Channel – Your Insurance Against Distortion
One of the standout features is the safety channel. This is an additional track recorded at a lower level, serving as a backup in case the main track distorts. To activate it, simply access the microphone’s settings and select the -10dB safety channel option. It’s a lifesaver when an unexpected loud noise occurs, like the sudden roar of a lion.
High-Frequency Boost – Making the Inaudible Audible
The high-frequency boost is another feature that sets the VideoMic Pro+ apart. It’s designed to enhance the clarity of sounds that might otherwise be subtle or lost. To use it, engage the boost setting on the mic. This is particularly useful when trying to capture the delicate sounds of bird wings or insect movements. For more insights on choosing the right microphone for your project, explore this comprehensive guide on the best microphones for filmmaking.
Be mindful, though, that this boost can also amplify unwanted noise, so use it judiciously.
Two-Stage High Pass Filter – Cutting Out Unwanted Low Frequencies
Low-frequency rumble from wind or traffic can muddle your recordings. The VideoMic Pro+’s two-stage high pass filter allows you to reduce or eliminate these frequencies. You can choose between 75Hz and 150Hz settings, depending on the severity of the interference. It’s a feature that can mean the difference between a recording dominated by noise and one that’s crisp and focused on your subject.
Tips for Recording Animal Sounds with the VideoMic Pro+
Recording animal sounds is both an art and a science. For more insights, check out our guide on animal video production like a pro.
Firstly, understand the behavior of the animals you’re recording. Anticipating their actions means you can be ready to capture their sounds at the right moment.
Secondly, position yourself carefully. Getting closer will yield better sound quality, but always prioritize safety – both yours and the animal’s.
Lastly, handle the microphone gently to avoid handling noise. Even small adjustments can be picked up by the sensitive VideoMic Pro+.
Understanding Animal Behavior for Better Sound Capture
Animal behavior can be unpredictable, but certain patterns can help you anticipate when and where to record. For example, birds are often most vocal at dawn and dusk, while insects may become more active and audible in the heat of the day.
Learning these patterns is key to being in the right place at the right time, microphone at the ready.
Positioning and Handling Techniques
Good mic positioning is essential. If you’re recording a stationary subject, position the mic as close as possible without disturbing the animal. For moving subjects, aim to keep the mic pointed at the source of the sound, adjusting as needed while being mindful of handling noise.
Using a boom pole can help with positioning, especially if you need to keep a safe distance. Just be sure the pole is out of the camera’s shot!
Evaluating Audio Quality: VideoMic Pro+ in the Field
After recording, it’s time to evaluate your audio. What should you listen for? Clarity, depth, and naturalness. You want the sound to be as true to life as possible, with a richness that adds texture to your visual footage.
Listening for Clarity, Depth, and Naturalness
Clarity is about the cleanliness of the sound – no background hiss or interference. Depth gives the sense of space and environment, and naturalness means the sound is true to the source – a lion’s roar should be as imposing as it is in real life.
Play back your recordings, preferably with high-quality headphones, and listen for these qualities. If something’s off, consider what adjustments you can make in the field to correct it.
Comparing the VideoMic Pro+ with Other Industry Favorites
How does the VideoMic Pro+ stack up against other mics? It’s a question worth exploring. To give you a clear picture, let’s compare it to another industry favorite:
|
Feature |
RØDE VideoMic Pro+ |
Industry Favorite Mic |
|---|---|---|
|
Polar Pattern |
Super-cardioid |
Varies |
|
Frequency Response |
20Hz – 20kHz |
Varies |
|
High Pass Filter |
Two-stage (75Hz/150Hz) |
Usually single stage |
|
Power Options |
Rechargeable battery/USB |
Usually battery only |
|
Additional Features |
Safety Channel, High-Frequency Boost |
Depends on the model |
This comparison shows that while other mics may have similar features, the VideoMic Pro+ offers unique advantages, particularly with its dual high pass filter and power options.
Maintaining Your VideoMic Pro+ for Longevity
Taking care of your microphone is essential for ensuring its longevity and performance. Here’s what you need to know:
Clean your microphone after each use, especially if you’ve been recording in dusty or damp conditions. A soft, dry cloth is usually sufficient for the body, while the windscreen may require gentle brushing.
Store the microphone in a dry, cool place. If you’re not going to use it for an extended period, remove the battery to prevent leakage.
Regularly check your cables and connectors for signs of wear. A loose connection can result in poor audio quality or even equipment failure in the field.
Cleaning and Storage Best Practices
Here are some best practices for cleaning and storage:
-
Use a soft-bristled brush to clean the microphone grill and remove any debris.
-
Detach the windscreen and wash it with mild soapy water, letting it air dry completely before reattaching.
-
Store the microphone in its original case or a padded bag to protect it from shocks and environmental factors.
By following these simple steps, you can keep your VideoMic Pro+ in top condition, ready for your next adventure into the wild.
Cleaning and Storage Best Practices
To ensure the RØDE VideoMic Pro+ performs optimally throughout its lifespan, it’s critical to maintain proper cleaning and storage routines. Dirt, dust, and moisture are the nemeses of high-quality audio equipment. After each field use, take a moment to wipe down the microphone body with a dry, lint-free cloth to remove any particulates. For the windscreen and furry windjammer, if they’ve been exposed to the elements, a more thorough cleaning might be necessary.
For storage, the original packaging of the VideoMic Pro+ is designed to protect the microphone when not in use. Keep it in a cool, dry place, away from direct sunlight or extreme temperatures. If you’re storing the microphone for an extended period, it’s wise to remove the battery to prevent any potential corrosion from battery leakage.
Dealing with Wear and Tear
Regular fieldwork will inevitably expose your VideoMic Pro+ to wear and tear. Inspect the microphone and its accessories periodically for any signs of damage. Pay special attention to the shock mount, as it’s a critical component that can affect the audio quality if it becomes loose or damaged. Also, check the cables and connection points for fraying or looseness that could compromise the audio signal.
If any parts do need replacing, RØDE offers spare parts and a comprehensive warranty. Handling the microphone with care, using the included carrying pouch, and being mindful of environmental hazards can go a long way in preserving its condition.
Final Thoughts on Rode VideoMic Pro+ in Animal Documentary Production
The RØDE VideoMic Pro+ is not just another piece of gear; it’s a storyteller’s companion, designed to bring the natural world to your audience with an authenticity that can only be captured with superior audio. Its robust build, advanced features, and exceptional sound quality make it a formidable tool for wildlife filmmakers who are serious about their craft.
Whether you’re an aspiring documentarian or a seasoned pro, the VideoMic Pro+ offers a level of immersion that can make your work stand out. It’s a testament to the power of audio and its ability to connect us with the world in a way that visuals alone cannot.
Real-world Success Stories
Many wildlife filmmakers have shared stories of how the VideoMic Pro+ has elevated their work. From capturing the haunting calls of wolves in remote forests to the bustling sounds of a bird market in an urban setting, the microphone has proven its versatility and reliability time and again.
One filmmaker recounted how the VideoMic Pro+ picked up the subtle sounds of a snow leopard’s footsteps in the Himalayas, a sound so faint it was barely audible to the human ear but became a highlight in the documentary.
Is the Rode VideoMic Pro+ Right for You?
If you’re dedicated to capturing the true essence of wildlife and the environments they inhabit, the VideoMic Pro+ is a sound investment. Its adaptability to different filming conditions, the quality of audio it captures, and its user-friendly design make it suitable for both novices and professionals. Consider your specific needs, the environments you’ll be shooting in, and the types of sounds you want to capture when deciding if this microphone is the right fit for your documentary toolkit.
Frequently Asked Questions
How does the VideoMic Pro+ handle wind noise?
The VideoMic Pro+ is equipped with a foam windscreen and an optional furry windjammer, both designed to reduce wind noise effectively. The two-stage high pass filter also helps to minimize low-frequency wind rumble, ensuring that your recordings are clear even on breezy days.
Can the VideoMic Pro+ be used with any camera?
Yes, the VideoMic Pro+ can be used with virtually any camera that has a 3.5mm microphone input. It’s also compatible with smartphones and tablets using an appropriate adapter or interface.
What is the battery life like on the VideoMic Pro+?
The VideoMic Pro+ is powered by a rechargeable LB-1 lithium-ion battery, which provides up to 100 hours of recording time. The microphone can also be powered via micro USB or a standard AA battery in a pinch.
Does the VideoMic Pro+ require additional accessories?
While the VideoMic Pro+ comes with everything needed to get started, additional accessories such as the RØDE Micro Boompole and DeadCat VMPR windshield can enhance its functionality and performance in certain situations.
How does the VideoMic Pro+ compare to lavalier mics for animal documentaries?
Lavalier mics are great for close-up and discreet audio capture, particularly for human subjects. However, for the broad and rich soundscape of animal documentaries, the directional and more powerful capture of the VideoMic Pro+ is generally more suitable. It can pick up a wider range of sounds from a distance, which is often necessary when filming wildlife.